
Embossed details usually look flat or inconsistent because the artwork, die and counter-die, paperboard, surface finish, press settings and relief location were not approved as one production system. More pressure is not a reliable cure. It may deepen one area while crushing fine lines, marking the reverse, cracking the surface or distorting a nearby crease.
The practical fix is to define the intended tactile result, simplify features that cannot survive the chosen material, and approve a production-intent sample under directional light. Buyers should compare relief depth, edge definition, surface damage and register—not just ask whether the logo is “embossed.”

First describe the defect precisely
“The embossing is weak” can refer to several different failures. Place the approved sample and production pieces under the same low-angle light. View them from more than one direction and touch them with clean hands. Record the box position, sheet or pallet identification, and whether the defect repeats in the same artwork area.
| What you see | Likely area to investigate | Useful first comparison |
|---|---|---|
| Entire relief is too shallow | Tool geometry, counter-die, material response or press setup | Production sheet versus the signed production-intent sample |
| Fine lines disappear but broad shapes rise | Artwork detail, die relief and paperboard compressibility | Simplified artwork trial on the same board |
| One side is deeper than the other | Tool parallelism, make-ready or local thickness variation | Same image at several positions across the sheet |
| Surface cracks or turns pale | Board and coating flexibility, excessive deformation or nearby crease stress | Unprinted board, printed sheet and laminated sheet |
| Foil and relief do not coincide | Register, sheet stability, sequence or combination tooling | Registration marks and retained setup sheet |
| Relief is good initially but later looks crushed | Stack pressure, packing orientation or downstream handling | Fresh press sample versus packed and shipped samples |
Do not combine those symptoms into a single defect percentage. A missing hairline, a foil-register shift and a flattened broad emblem require different corrections.
How embossing creates a permanent relief
Embossing raises the selected design; debossing presses it inward. In conventional production, a shaped die and matching counter-die force the paperboard into a three-dimensional form. Holmen’s technical explanation of paperboard embossing and debossing notes that the operation uses pressure and heat and tests the board’s strength, resilience, flexibility and surface finish. The inner layers must reshape without breaking, while the surface needs to remain intact.
This is why a digital artwork proof cannot approve the final relief. It can confirm position and graphics, but it does not reproduce the physical tool, production board or finish stack.
Why fine embossed details become soft or uneven
The artwork asks for more detail than the material can hold
Thin strokes, tiny counters, sharp corners and several levels packed into a small area can merge or weaken when transformed into relief. Increasing pressure may close the spaces further. Before making the production tool, separate essential brand shapes from decorative micro-detail. Ask the toolmaker which gaps, line weights and transitions are robust for the nominated board and relief depth.
On compact flip-top cigarette cartons, the available face may be narrow and interrupted by the lid or fold geometry. A simplified emblem can remain recognizable after erection, while a dense pattern may look sharp only on the flat artwork file.
The selected paperboard and surface stack respond differently
Two boards with the same grammage can behave differently because their caliper, ply construction, fibre mix, coating and surface structure differ. Holmen’s guidance on surface structure and smoothness recommends testing the intended conversion methods on the chosen paperboard. Embossing must therefore be sampled on the named production stock, not a convenient substitute.
Printing, varnish, film lamination, soft-touch layers and foil can change how the face stretches, reflects light and reveals the relief. A premium disposable-vape carton offering lamination, spot effects and embossing should be approved with the final combination in the final order. A plain white-board mock-up proves structure, not the decorated result.
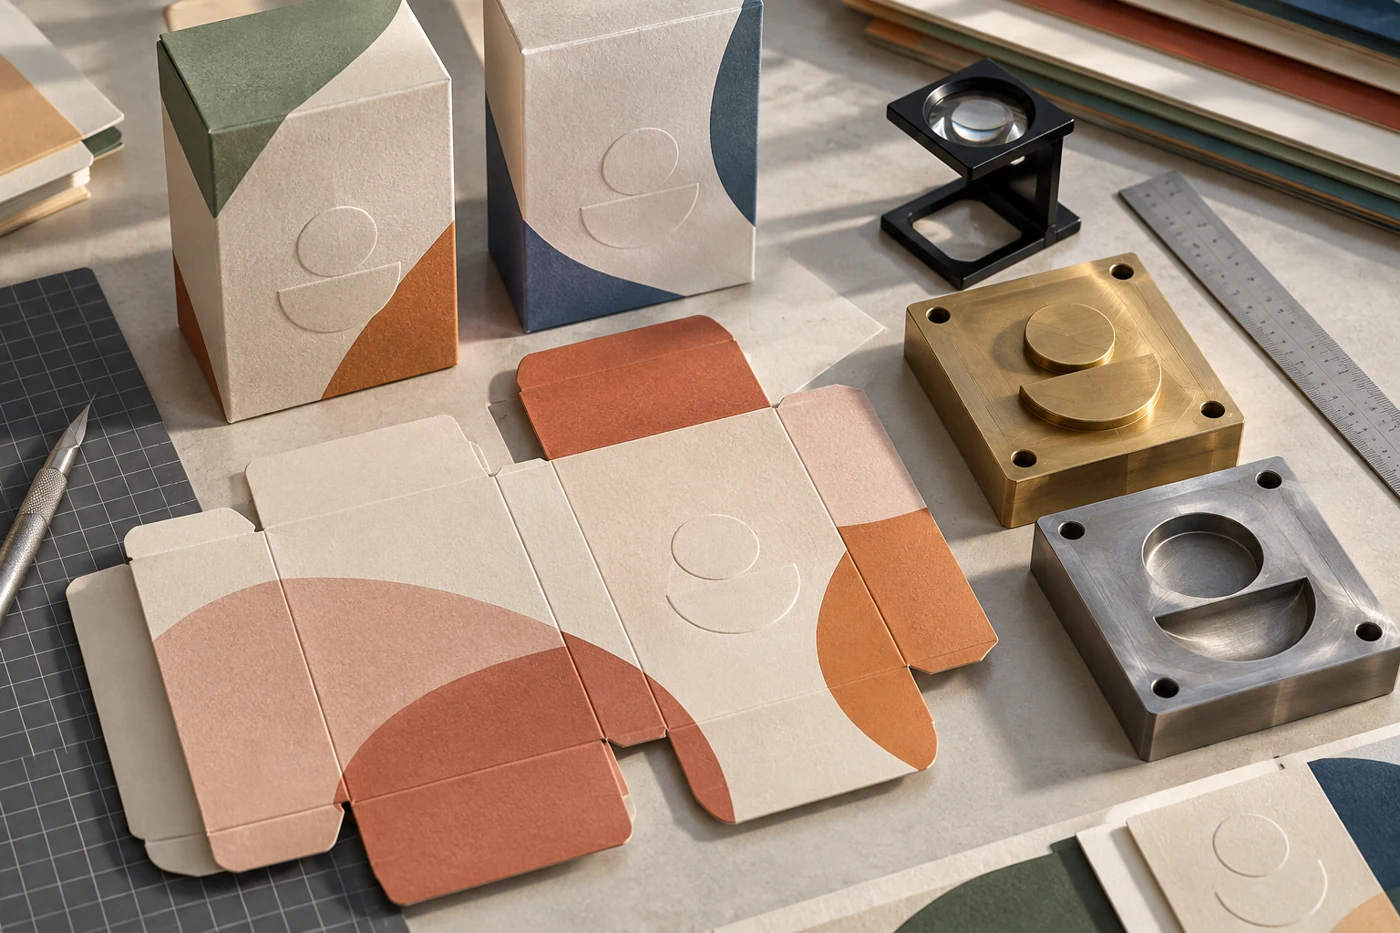
The die and counter-die do not support the intended shape
The die carries the image and the counter supports the reverse while the board is formed between them. Their geometry controls edge definition, depth transitions and the stress placed on small features. A single-level tool suits a simple logo; sculpted or multi-level relief requires more complex tooling and tighter coordination between artwork, material and setup.
Ask whether the quotation includes a single-level emboss, a registered emboss over print, a foil emboss, or a multi-level sculpted tool. Those are not interchangeable descriptions, and they do not carry the same tooling cost or production risk.
The relief sits too close to a crease, cut or functional feature
An embossed area needs space to form without interfering with another conversion operation. Relief crossing a score can become distorted when the carton folds. Relief close to a cut edge can weaken the visual boundary or make small registration differences more obvious. On a child-resistant pre-roll box, decorative relief should not compromise the operating area, locking feature or repeated handling path.
Mark creases, cuts, glue zones, windows, magnets and closures on the same production dieline used to position the embossing. Do not approve the finish on an isolated logo file.
Print, foil and embossing are not in register
When a raised shape must align with print or metallic foil, even a small relative shift becomes visible at the edges. Sheet movement, sequencing, register setup and tool position all matter. BOBST’s official hot-foil and embossing equipment information highlights stable stamping force and camera-read register marks as controls for aligning embossing or foil with printed sheets. That is equipment context, not a guarantee for any particular job.
For foil embossing, decide whether the operations will be combined or separate. Then approve the exact sequence. The same gold color applied successfully on a flat area does not prove that it will register and conform over a raised image.
Choose the finish by effect, risk and budget
| Finish route | Best suited to | Main trade-off to approve |
|---|---|---|
| Blind single-level emboss | Clean logos and simple patterns without ink or foil alignment | Relief visibility depends strongly on material, depth and lighting |
| Deboss | Indented marks that can tolerate reverse-side effects | Depth and backing structure must not interfere with the pack |
| Registered emboss over print | Artwork requiring tactile and printed shapes to coincide | Adds register sensitivity and proofing requirements |
| Foil emboss | Premium metallic relief with strong shelf impact | Combines transfer, surface and relief variables |
| Multi-level or sculpted emboss | Larger hero graphics where depth transitions create value | Higher tooling cost and greater material qualification effort |
Use relief where touch and shadow add real value. Applying it to every graphic can dilute the hierarchy, increase tooling area and complicate control. For a custom hemp-oil carton, one restrained front-panel mark may communicate more clearly than a dense full-surface pattern competing with product information.

Approve the production-intent sample, not a visual substitute
A useful approval sequence separates decisions rather than trying to settle everything with one sample:
- Artwork and position review: confirm the relief boundary, direction, levels and exclusion zones on the final dieline.
- Material trial: form representative features on the named board and final surface stack.
- Tool proof: approve the actual die and counter-die result, including reverse-side appearance.
- Erected-box check: fold, glue, fill and close the package to reveal interaction with creases and structural loads.
- Retained production reference: sign a sample under agreed lighting and keep it protected from crushing.
For a large book-style rigid gift box, check whether the wrapped surface, board joints and lid geometry remain visually calm around the relief. The approved loose wrap sheet is not enough; the finished rigid box may introduce seams, edges and adhesive variation.
Write an acceptance standard that can be inspected
“Deep and premium” is not measurable. The purchase record should identify the approved tool version, board and finish stack; the location and viewing method; features that must remain open and distinct; permitted reverse marking; register reference; and the signed sample. If a numeric tolerance is important, agree it with the converter and measurement method rather than copying a generic number from another job.
During production, compare samples from several sheet positions and time intervals. Inspect under consistent raking light, but also view the box in its normal retail orientation. Excessive low-angle lighting can exaggerate harmless variation; soft frontal lighting can hide a failure customers will feel.

What can be done when the finished embossing is unacceptable?
Quarantine the affected lot and retain unopened comparison packs. Separate relief-depth, surface-damage and register complaints. Compare them with the signed sample, tool revision and setup sheets. If the artwork is too fine, revise the design before increasing force. If variation changes across the sheet, investigate make-ready, tool alignment and material consistency. If the surface cracks, test a compatible board or finish stack and reduce deformation where possible.
Do not assume completed boxes can be safely re-embossed. A second pass may be limited by print, foil, folds, glue, inserts or the loss of reliable registration. Ask the converter for a controlled trial before authorizing rework.
Questions to include in your RFQ
- Is the requested effect embossing, debossing, registered embossing, foil embossing or multi-level relief?
- Which paperboard, wrap paper, coating and lamination will be used?
- Which artwork features are at risk of filling, softening or cracking?
- How far is the relief from creases, cuts, glue zones and functional features?
- Will the proof use the production tool and final material stack?
- How will depth, edge definition, register and reverse marking be approved?
- How will embossed sheets or boxes be stacked and protected from crushing?
FAQ
Does deeper embossing always look more premium?
No. Depth must suit the artwork, board and box. Excessive depth can soften small details, crack the surface, mark the reverse or interfere with folds. A crisp shallow result may be more controlled than a deep but damaged one.
Can a digital proof approve embossing quality?
No. It can approve artwork and position, but it cannot reproduce physical relief. Final approval needs the intended material, finish stack, tool and box structure.
Can embossing be combined with foil?
Yes. The job may use combination tooling or separate operations, depending on the design and production plan. Approve transfer quality, relief and register together.
Why did the sample look better than mass production?
A handmade or carefully adjusted sample may not represent production speed, sheet position, stack pressure or the final material batch. Tie approval to a production-intent process and retained reference, then sample across the run.
Make relief a controlled packaging specification
Good embossing begins before the press: the artwork must suit the material, the tool must support the intended depth, and the relief must coexist with every print, finish and structural feature. Send PaperBoxPro your final dieline, relief artwork, board preference, finish sequence and product dimensions. Request an embossing feasibility and sample review before approving the production tool.